
# Getting Started with running SRI - Stratum V2 reference implementation
This document aims to assist users in deploying the SRI software stack efficiently. Stratum v2 as a protocol is flexible, and allows users to run multiple different configurations.
There are 4 possible configurations for SV2 deployments:
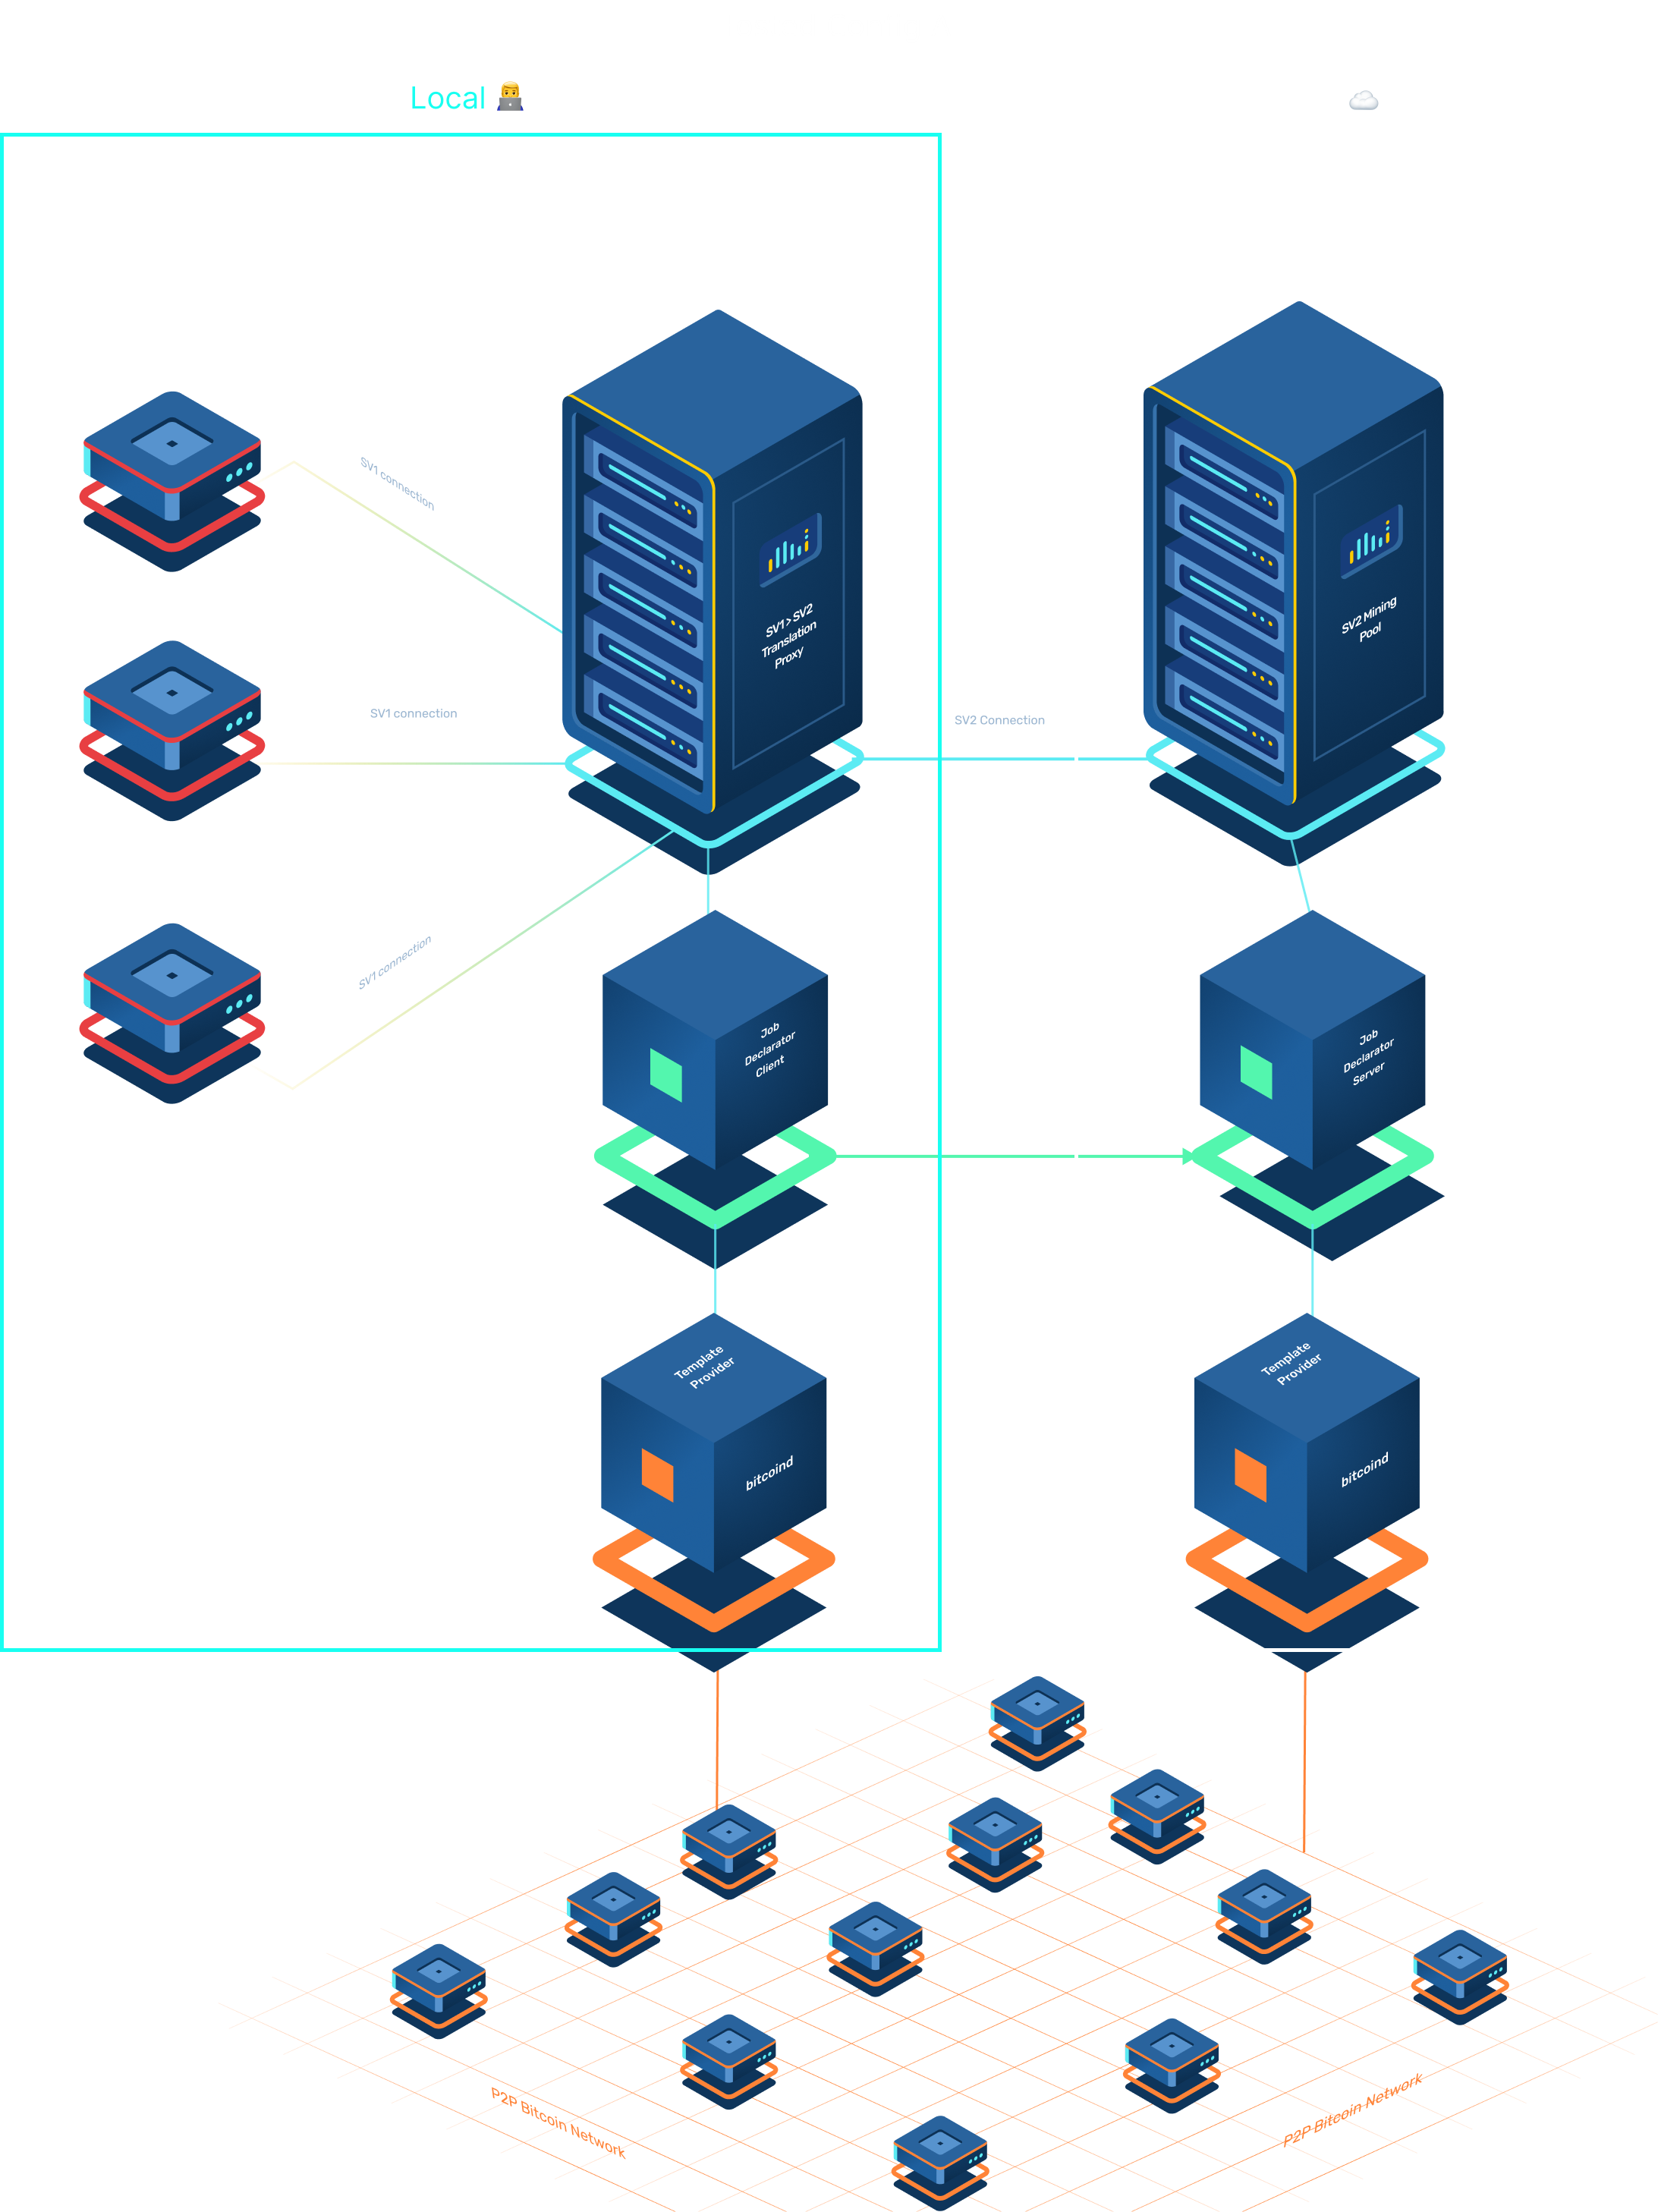
- Config A: SV1 firmware with Job Declaration Protocol
- Config B: SV2 firmware with Job Declaration Protocol
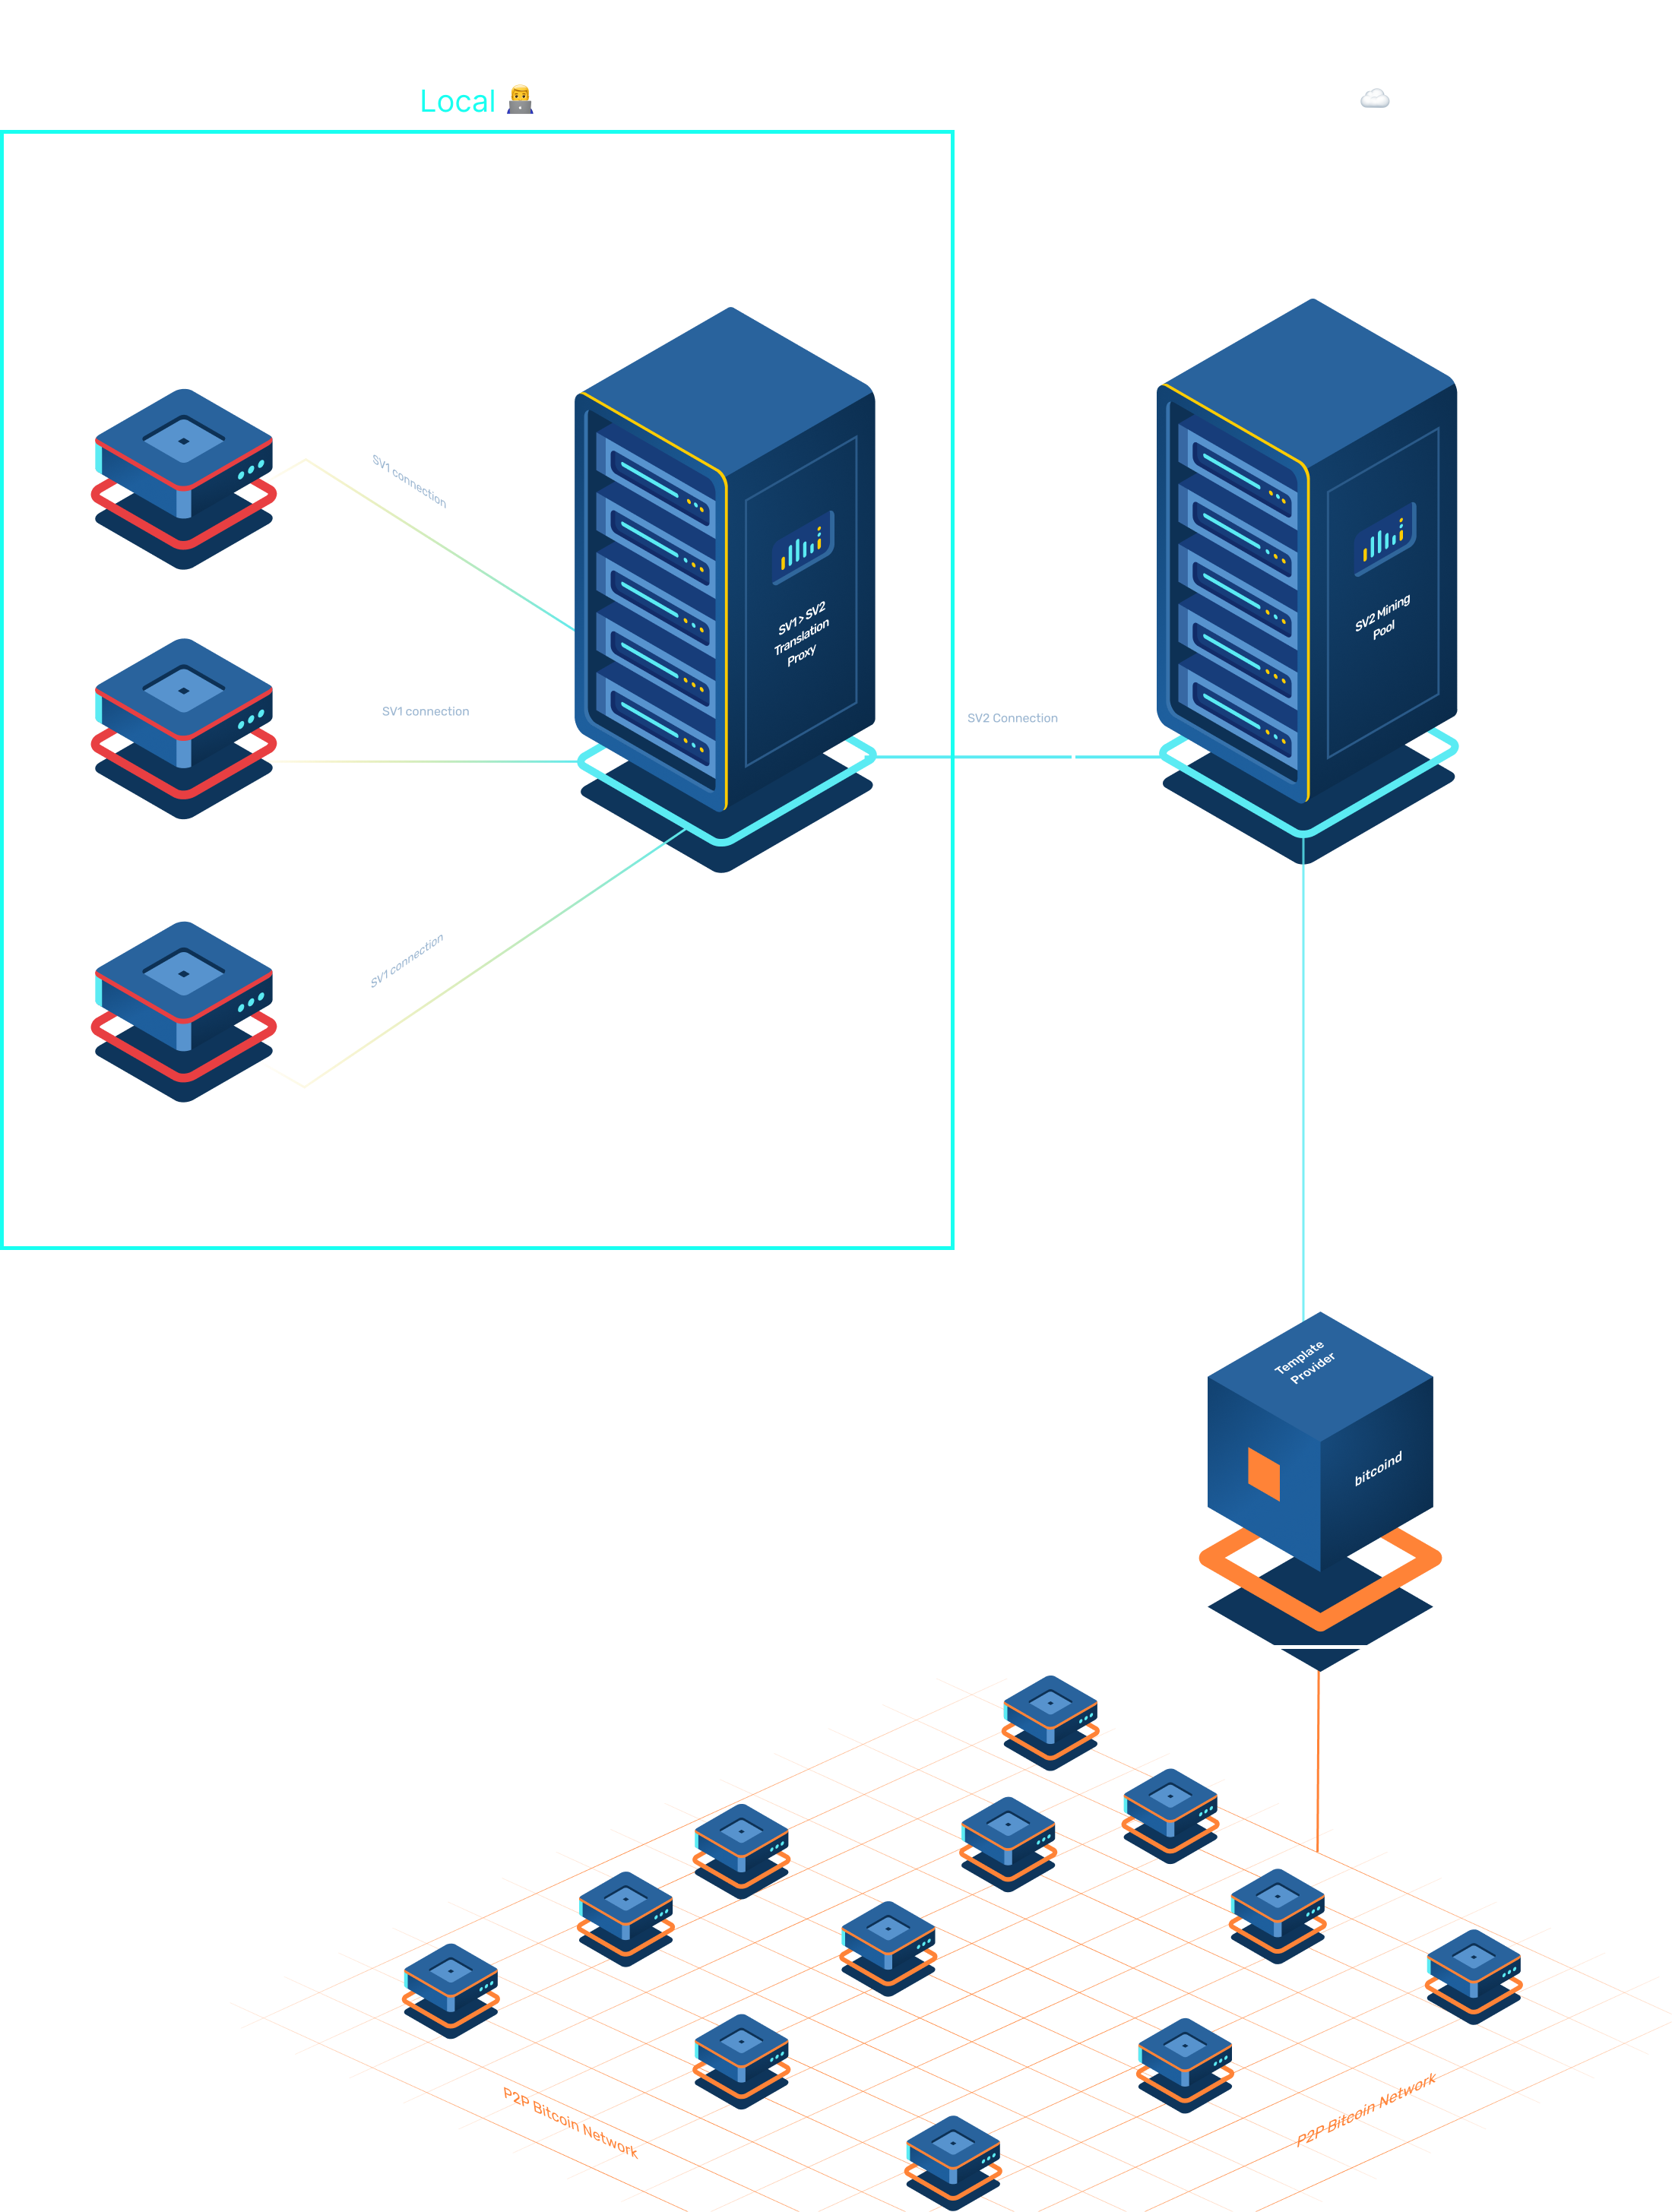
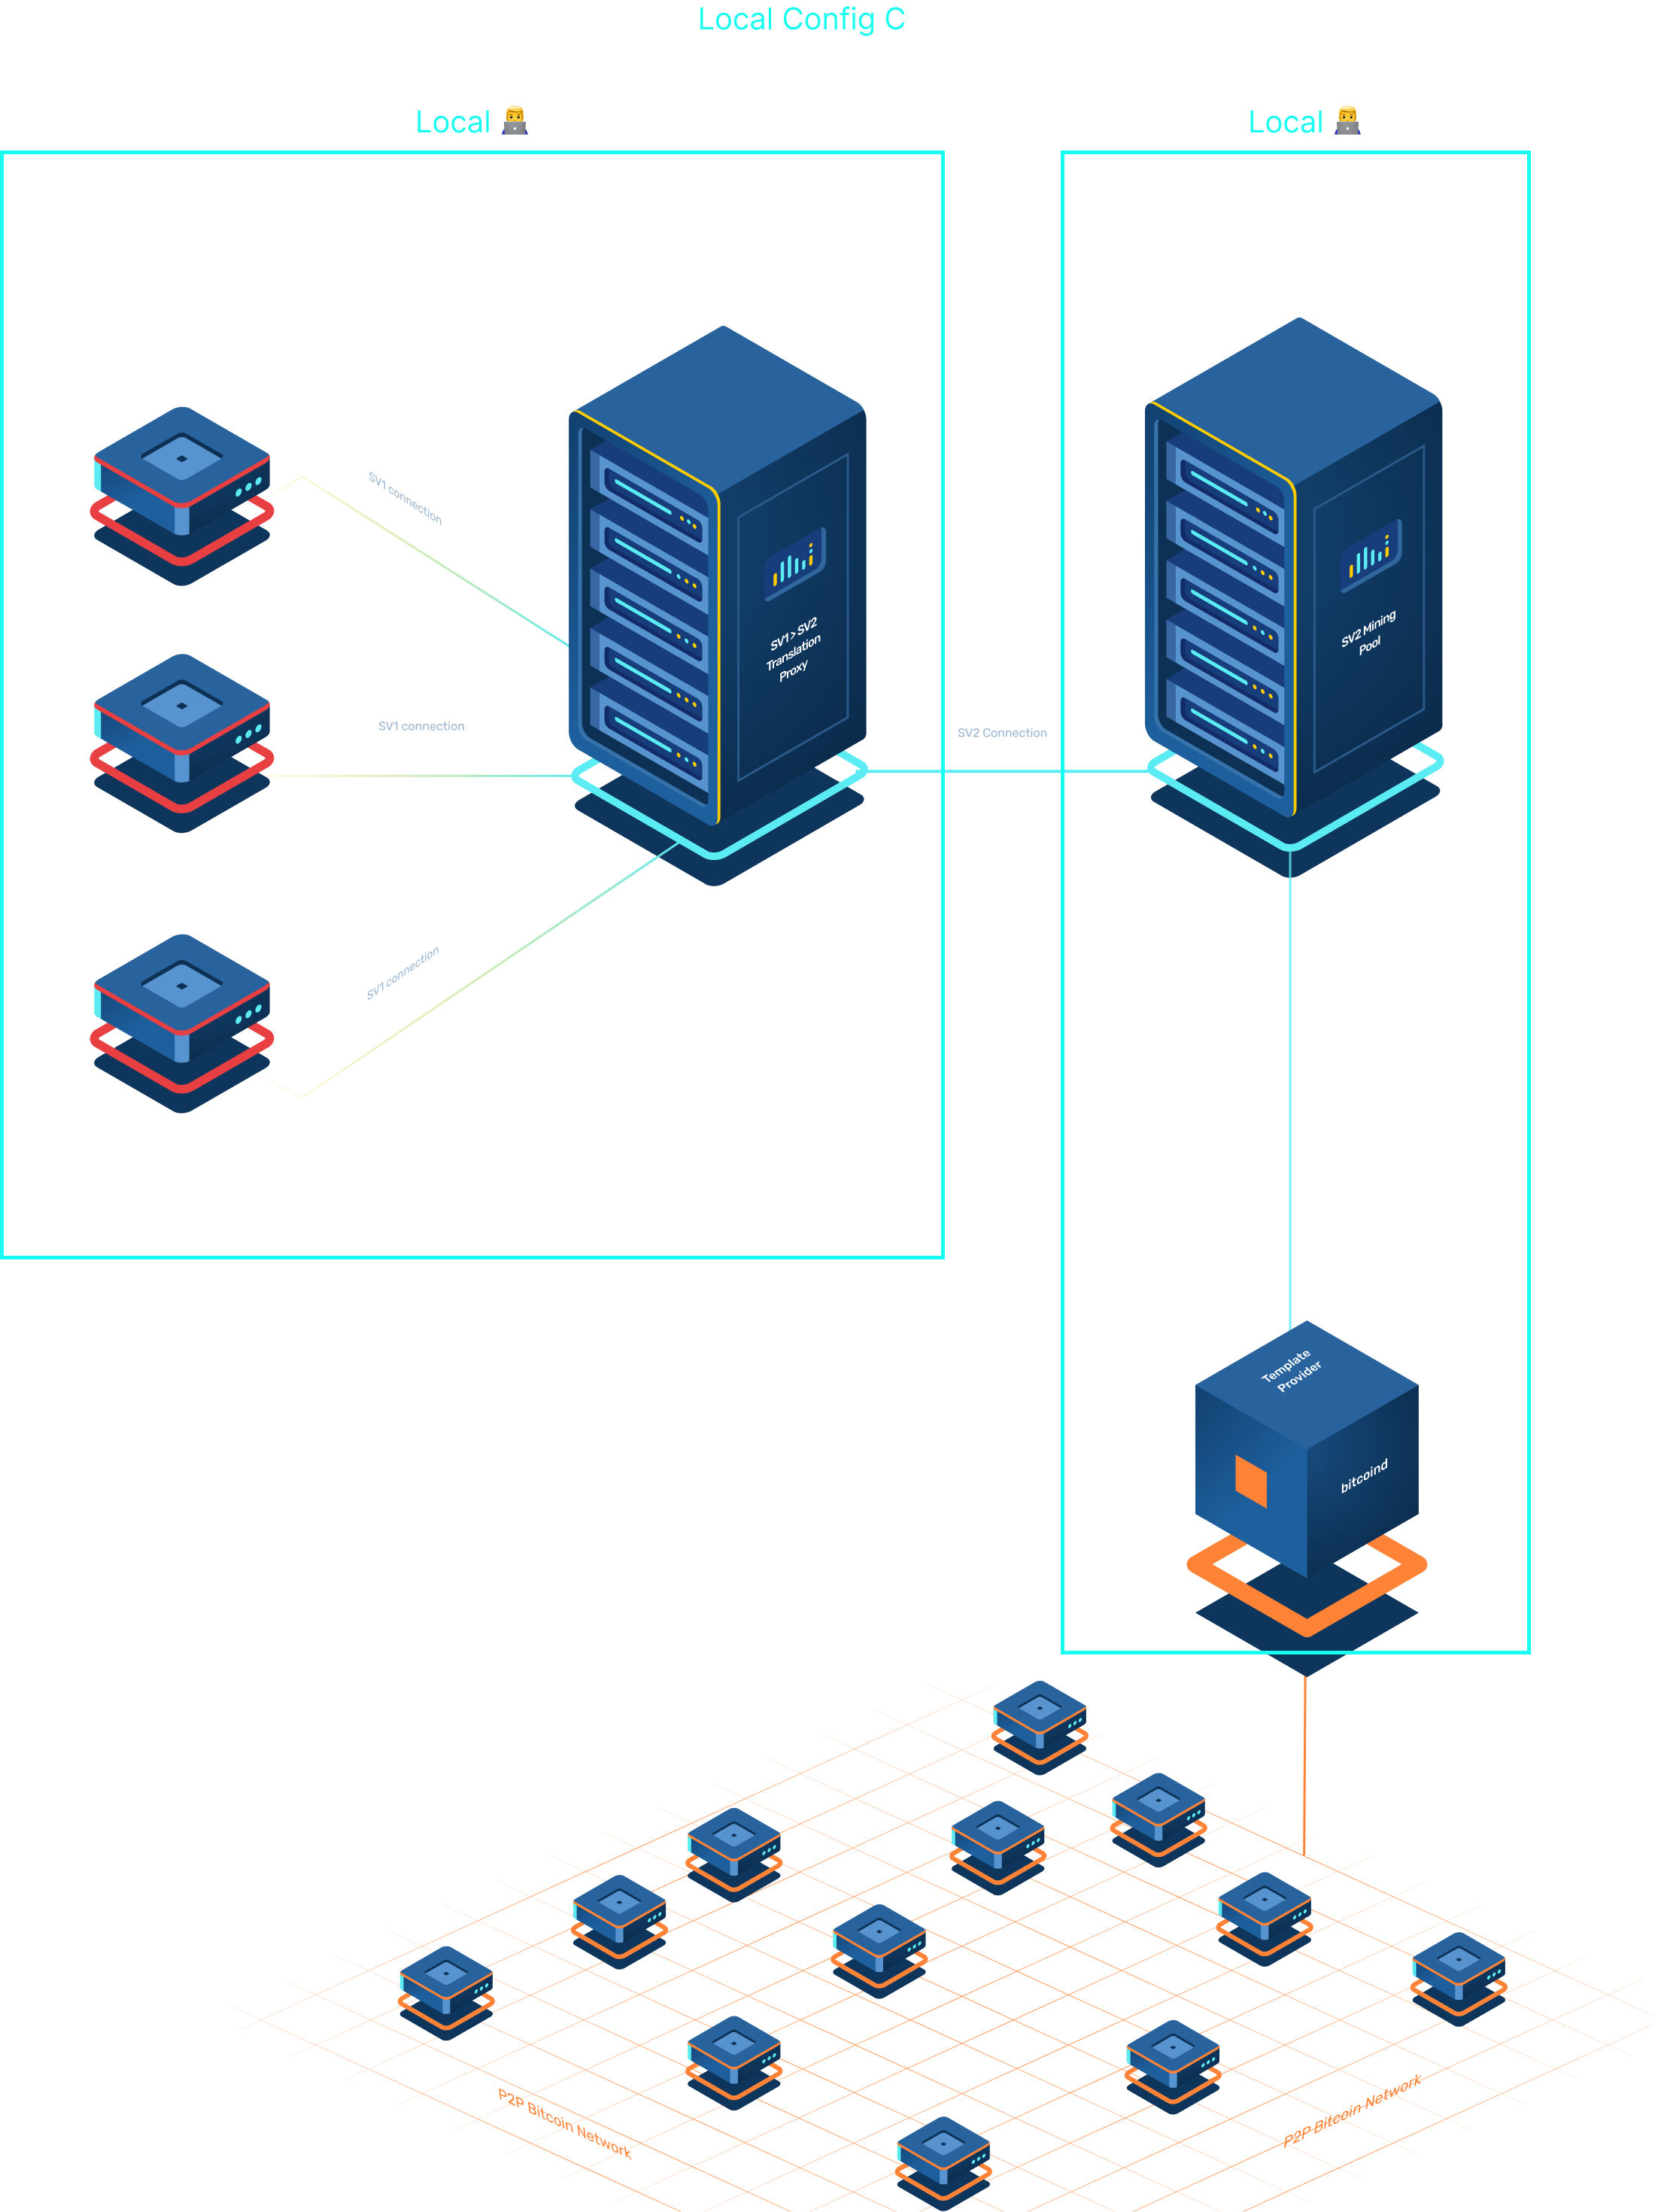
- Config C: SV1 firmware without Job Declaration Protocol
- Config D: SV2 firmware without Job Declaration Protocol
The Job Declaration Protocol allows miners to construct their own block templates.
We are going to focus on Configs A and C, because most of the mining industry today still uses SV1 firmware.
The SRI community is hosting a Pool, Template Provider (TP) and Job Declarator Server (JDS) to aid testing on the miner side.
Alternatively, you can also deploy your own Pool, TP and JDS to get the full infrastructure experience.
# Table of Contents
- Prerequisites
- Choose your Setup
- Connect Mining Devices
- CPU miner
- Adjust tproxy-config (optional)
- Monitoring for blocks
- Customizing configuration
- Community Support
# Prerequisites
# Install Rust
You'll need Rust installed on your machine. If it's not:
curl --proto '=https' --tlsv1.2 -sSf https://sh.rustup.rs | sh
# Clone SRI repository
git clone https://github.com/stratum-mining/stratum
# Run Template Provider
⚠️ Note: This is only necessary if you're going to be running either:
- Local Config C
- Hosted Config A
- Local Config A
You can skip this step if you're running Hosted Config C.
Download a release from Sjors' fork of Bitcoin Core from https://github.com/Sjors/bitcoin/releases (opens new window)
Edit your bitcoin.conf file by adding:
[testnet]
server=1
rpcuser=username
rpcpassword=password
Start the Template Provider:
./bitcoin-sv2-tp-0.1.2/bin/bitcoind -testnet -sv2 -sv2port=8442 -debug=sv2
⚠️ Note: you need to wait until bitcoind is fully synced with the testnet before you proceed. You can watch mempool.space/testnet (opens new window) and compare the current testnet block height with your logs.
Optional paremeters:
There are optional parameters which can be used to better manage the Template Provider:
sv2interval- sets how often a new template is built (default is 30s)sv2feedelta- defines the delta fees to reach before sending new templates to downstreams (default is 1000 sats)loglevel=sv2:traceto get more detailed debugging
For example:
./bitcoin-sv2-tp-0.1.2/bin/bitcoind -testnet -sv2 -sv2port=8442 -sv2interval=20 -sv2feedelta=1000 -debug=sv2 -loglevel=sv2:trace
This way new templates are constructed every 20 seconds (taking the most profitable txs from the mempool) and they are sent downstream if new fees collected are more than 1000 sats.
# Choose your Setup
Choose one of the following:
| Setup Name | SV2 Pool | JDS | JDC | tProxy | Use-case | Job Declarator Protocol | Network |
|---|---|---|---|---|---|---|---|
| Hosted Config A | Hosted ☁️ | Hosted ☁️ | Local 🧑💻 | Local 🧑💻 | Miner-side testing. | YES | testnet3 |
| Local Config A | Local 🧑💻 | Local 🧑💻 | Local 🧑💻 | Local 🧑💻 | Developers who wish to deploy their own pool. | YES | testnet3 |
| Hosted Config C | Hosted ☁️ | - | - | Local 🧑💻 | Miner-side testing. | NO | testnet3 |
| Local Config C | Local 🧑💻 | - | - | Local 🧑💻 | Developers who wish to deploy their own pool. | NO | testnet3 |
# Hosted Config A
- Hosted:
- SV2 Pool
- Template Provider (
bitcoindsynced totestnet3) - Job Declarator Server
- Local:
- Job Declarator Client
- Translator Proxy
# Run Job Declarator Client (JDC)
cd roles/jd-client/config-examples/
cargo run -- -c jdc-config-hosted-example.toml
# Run Translator Proxy
cd roles/translator/config-examples/
cargo run -- -c tproxy-config-local-jdc-example.toml
You're ready to start mining. Skip to the Connect Mining Devices step.
# Local Config A
- Local:
- SV2 Pool
- Template Provider (
bitcoindsynced totestnet3) - Job Declarator Server
- Job Declarator Client
- Translator Proxy

# Run Template Provider
Make sure you followed the Run Template Provider Prerequisite.
# Run the SV2 Pool
cd roles/pool/config-examples
cargo run -- -c pool-config-local-tp-example.toml
# Run the Job Declarator Server (JDS)
cd roles/jd-server/config-examples
cargo run -- -c jds-config-local-example.toml
# Run Job Declarator Client (JDC)
cd roles/jd-client/config-examples/
cargo run -- -c jdc-config-local-example.toml
# Run Translator Proxy
cd roles/translator/config-examples/
cargo run -- -c tproxy-config-local-jdc-example.toml
You're ready to start mining. Skip to the Connect Mining Devices step.
# Hosted Config C
- Hosted:
- SV2 Pool
- Template Provider (
bitcoindsynced totestnet3)
- Local:
- Translator Proxy
# Run Translator Proxy
cd roles/translator/config-examples/
cargo run -- -c tproxy-config-hosted-pool-example.toml
You're ready to start mining. Skip to the Connect Mining Devices step.
# Local Config C
- Local:
- SV2 Pool
- Template Provider (
bitcoindsynced totestnet3) - Translator Proxy
# Run Template Provider
Make sure you followed the Run Template Provider Prerequisite.
# Run the SV2 Pool
cd roles/pool/config-examples
cargo run -- -c pool-config-local-tp-example.toml
# Run Translator Proxy
cd roles/translator/config-examples/
cargo run -- -c tproxy-config-local-pool-example.toml
You're ready to start mining. Skip to the Connect Mining Devices step.
# Connect Mining Devices
Connect mining device - Translator Proxy will be running on port 34255, so you will need just to edit your mining device(s) configuration, adding the line:
stratum+tcp://<tProxy ip>:34255
If you don't have an ASIC, skip to the CPU miner step below.
# CPU Miner
If you don't have a physical miner, you can do tests with CPU Miner.
Setup the correct CPUMiner for your OS:
- You can download the binary directly from here (opens new window);
- Or compile it from https://github.com/pooler/cpuminer (opens new window)
On the CPUMiner directory:
./minerd -a sha256d -o stratum+tcp://localhost:34255 -q -D -P
# Adjust tproxy-config (optional)
Depending on mining device you do run, you may have to adjust tproxy-config*.toml file in order to adjust the min_individual_miner_hashrate and channel_nominal_hashrate parameters to have an optimal difficulty target for the channel.
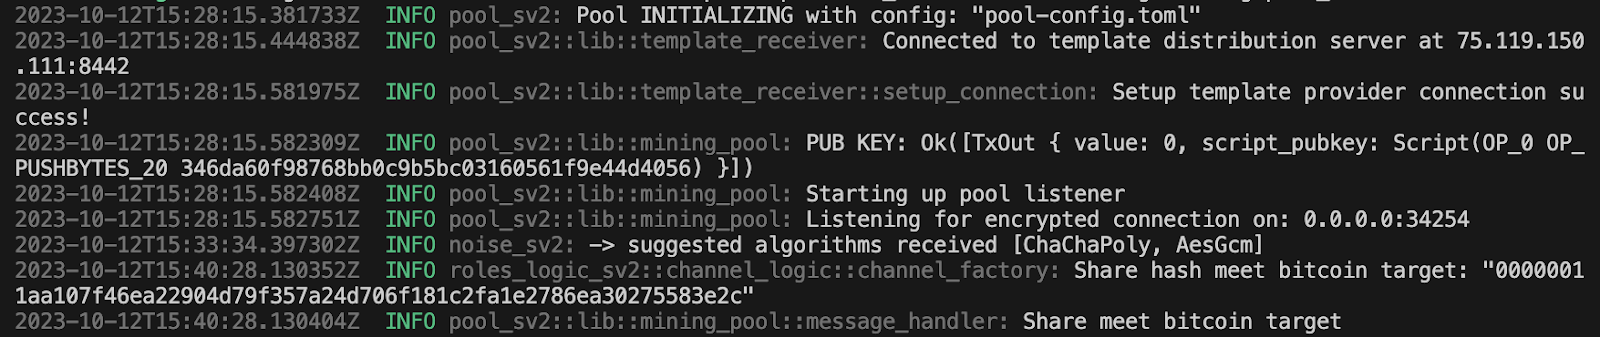
# Monitoring for blocks
Once set up, monitor the machines and role logs for any valid blocks found.
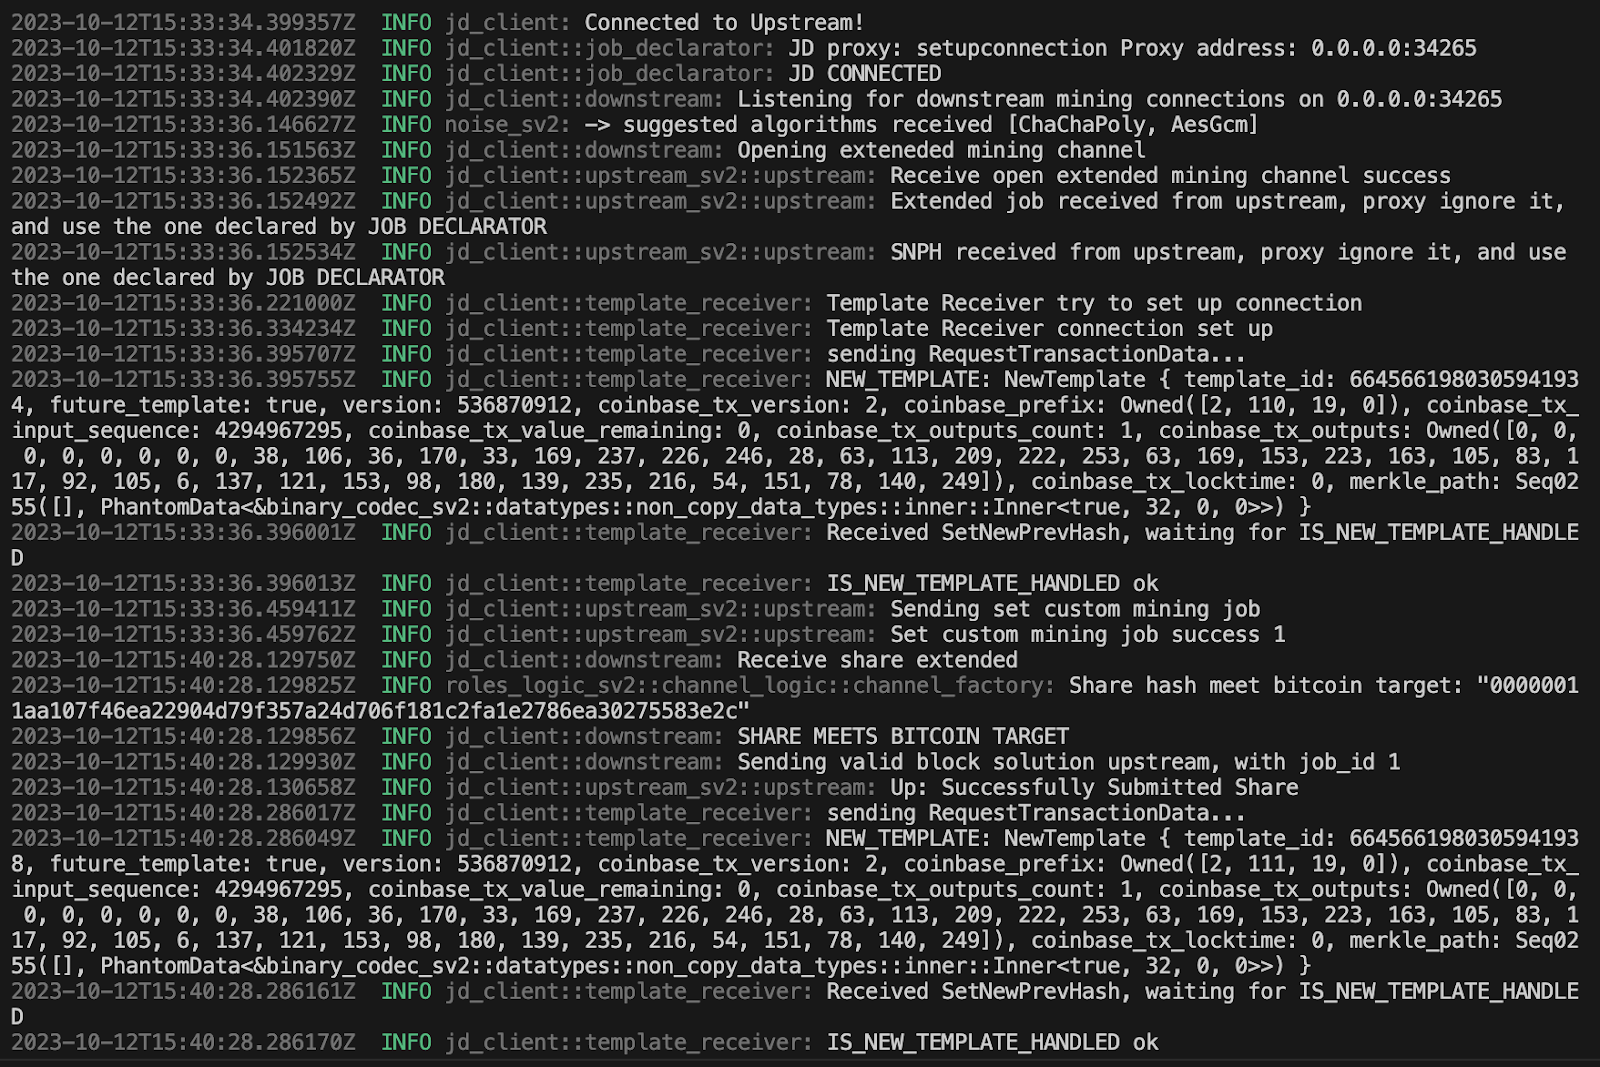
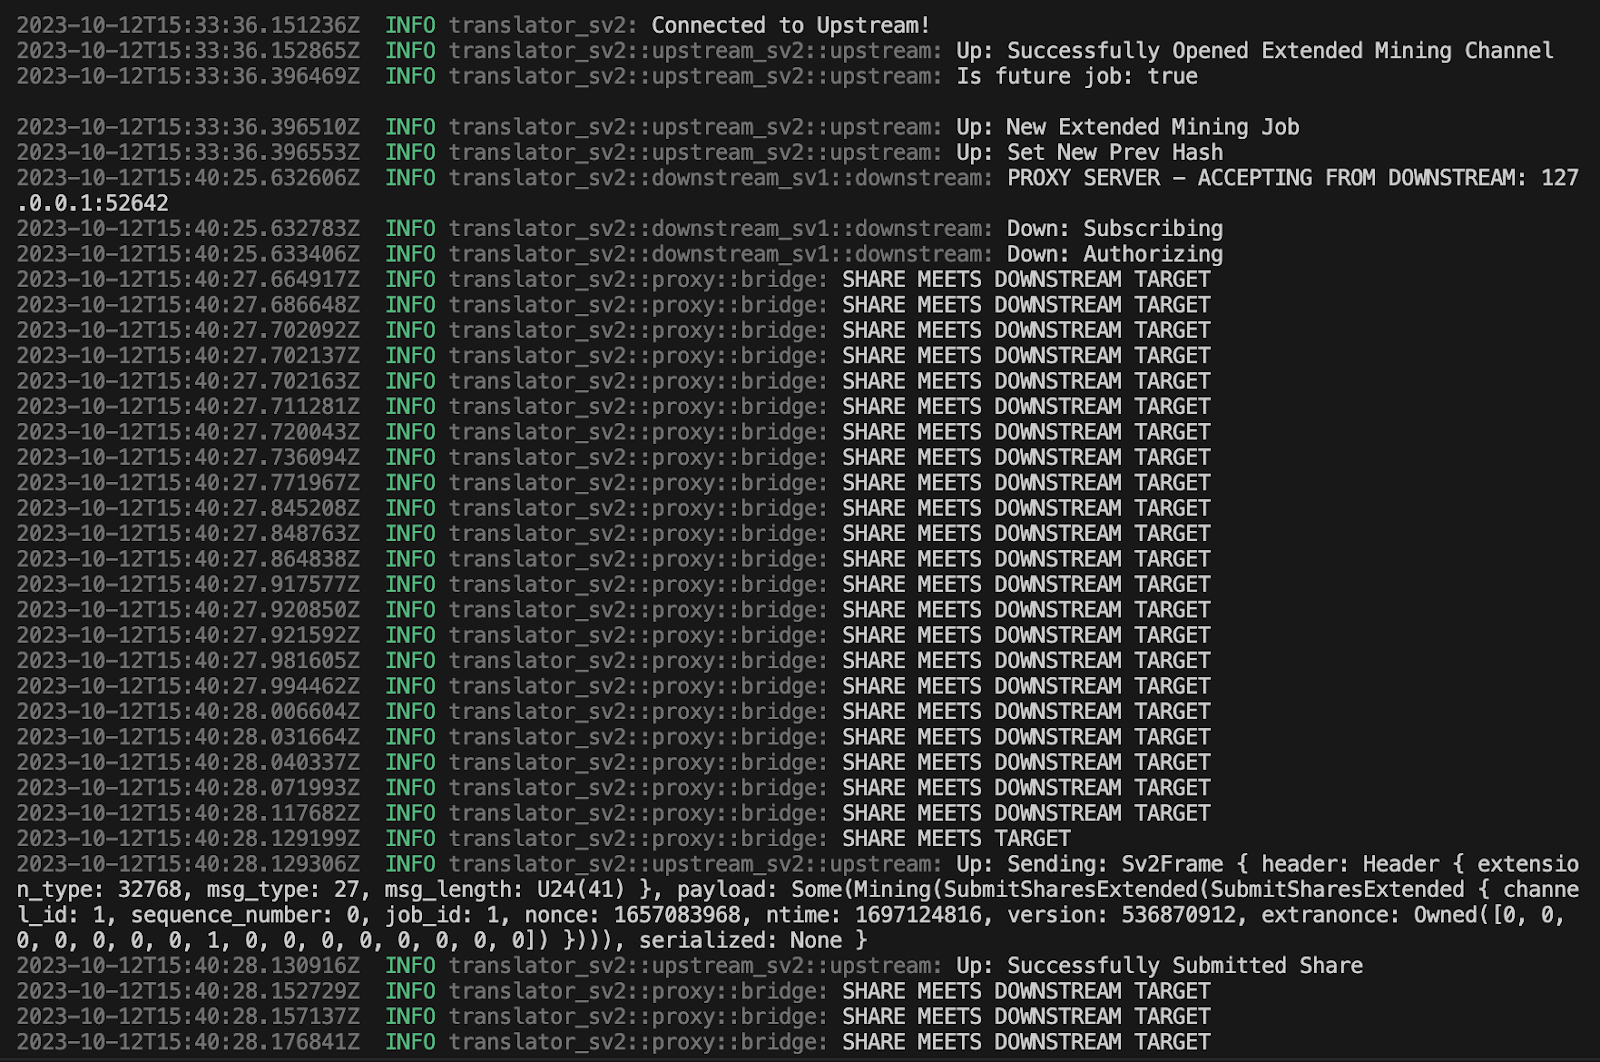
Following pictures detail the logs from tProxy, JDC, and Pool when a block is found.
Pool logs
Job Declarator Client (JDC) logs
Translation Proxy tProxy logs
If you didn’t change anything in the configuration files present in every role subdirectory, the valid block mined will be recognized by the string Stratum V2 SRI Pool (0x5374726174756d2076322053524920506f6f6c) inserted into the scriptSig of the coinbase tx input.
A way to look for it is to check the address tb1qa0sm0hxzj0x25rh8gw5xlzwlsfvvyz8u96w3p8 since the default coinbase output is configured to be a P2WPKH built with a public key = 036adc3bdf21e6f9a0f0fb0066bf517e5b7909ed1563d6958a10993849a7554075
You can perform a search on one of the following block explorers:
# Customizing configuration
# Customize the pool_signature string
To customize the string which is inserted into the scriptSig of the coinbase tx input, you need to run every role locally. To make changes, edit the pool_signature field present the config files:
- Hosted Config C: no changes needed, the hosted pool is imposing the
pool_signature - Local Config C:
roles/pool/config-examples/pool-config-local-tp-example.toml - Hosted Config A:
roles/jd-client/config-examples/jdc-config-hosted-example.toml - Local Config A:
roles/jd-server/config-examples/jds-config-local-example.toml+roles/jd-client/config-examples/jdc-config-local-example.toml(make sure that the strings are equal on both files, otherwise templates will be rejected by JDS)
# Customize the coinbase_output script
To customize the coinbase tx output script, you need to run every role locally. To make changes, edit the coinbase_output field in the config files:
- Hosted Config C: no changes needed, the hosted pool is imposing the
coinbase_output - Local Config C: no changes needed, the hosted pool is imposing the
coinbase_output - Hosted Config A:
roles/jd-client/config-examples/jdc-config-hosted-example.toml - Local Config A:
roles/jd-client/config-examples/jdc-config-local-example.toml+roles/jd-server/config-examples/jds-config-local-example.toml(make sure that thecoinbase_outputfield is identical on both files, otherwise templates will be rejected by JDS)
You can use any of the following script types: P2PK,P2PKH, P2WPKH, P2SH, P2WSH, P2TR. In case a public key is required, as explained in the config files, you can start by creating a testnet wallet on mobile, using Green wallet, or a desktop one, using Electrum wallet, and extract the extended public key they provide. At this point, you can derive the child public key to use in the configuration files, using this tool (opens new window).
# Community support
If you get any issue during testing phase, feel free to join our community Discord (opens new window) to get community support or file a bug report on GitHub (opens new window).